Now that you know what is a CDN from our previous post, you need to put it in action. In fact, by simply integrating your website or app with a CDN, you can dramatically improve its performance. This translates into a faster load times, and better user experience. Even more, this kind of improvement to to the UX is also easy to measure (i.e. how long it takes to load). As a result, search engines loves to measure that and prioritize the fastest websites. With this simple tool, you can take any website to the next level. In this post, we explain exactly that: how to use CDN to improve your website speed.
How to use CDN
In this article, we assume you are familiar with CDNs, and at least know what they are. If you don’t, simply take this quick reading.
Select the right CDN for you
In short, a CDN is a service some company provides for you. You could create your own CDN, but this is extremely expensive and complicated, with virtually no benefit for the average website or app. Thus, we focus on how to use CDN that works out-of-the-box. Mainly, we have three options when it comes to self-service CDNs.
- CloudFlare is the first company that started pushing CDNs. In fact, CDNs are their core business
- Amazon Web Services offers a CDN product: AWS CloudFront
- Microsoft has its own CDN too on Azure
Prices are similar, with AWS slightly more convenient than Azure. However, only CloudFlare offers some sort of “CDN starter pack” for free. Because of that, we are going to stick with CloudFlare in this how to use CDN tutorial. When your application grows, you may want to do a deeper analysis to select the right CDN. Your choice may be influenced by the budget, and where the CDN servers are.
Thus, start by registering at cloudflare.com.
CDN via DNS
CloudFlare guides you step-by-step in setting up your CDN. Their CDN leverages DNS, the protocol that translates domain names (like ictshore.com) into IP addresses (like 62.43.198.11). More or less, an IP address correspond to a server somewhere in the Internet. Without a CDN, you will have your domain name converted to the IP of your server by DNS. Instead, with this CDN, you convert it to one of cloudflare’s IP addresses. This way, the traffic will go to CloudFlare’s servers, that will be your cache.
This means one thing: you need some changes in the DNS setup. Fortunately, CloudFlare can ease this because they provide their own DNS service. Thus, first, register to CloudFlare and start configuring your domain. More or less, they only need to know what is your domain. Once this is done, they will attempt to import all DNS entries that you already have with our provider. This is completely automatic, but you may want to check they imported everything correctly. At this point, they will ask you to change your name servers.
A name server is simply a DNS server that contains domain name to IP address associations, and provides them to whoever asks. Each domain has generally two to four name servers associated, just in case one fails. You will have the ones from your provider where you have registered the name, and you need to set the ones CloudFlare provides you. This is done entirely in your domain registrar’s web portal, and may take a few hours to be effective.
Once you do that, we are ready to play with our CDN.
Inside CloudFlare Panel
If you are here, it means you already changed your name servers. If you didn’t, take a look at the previous section.
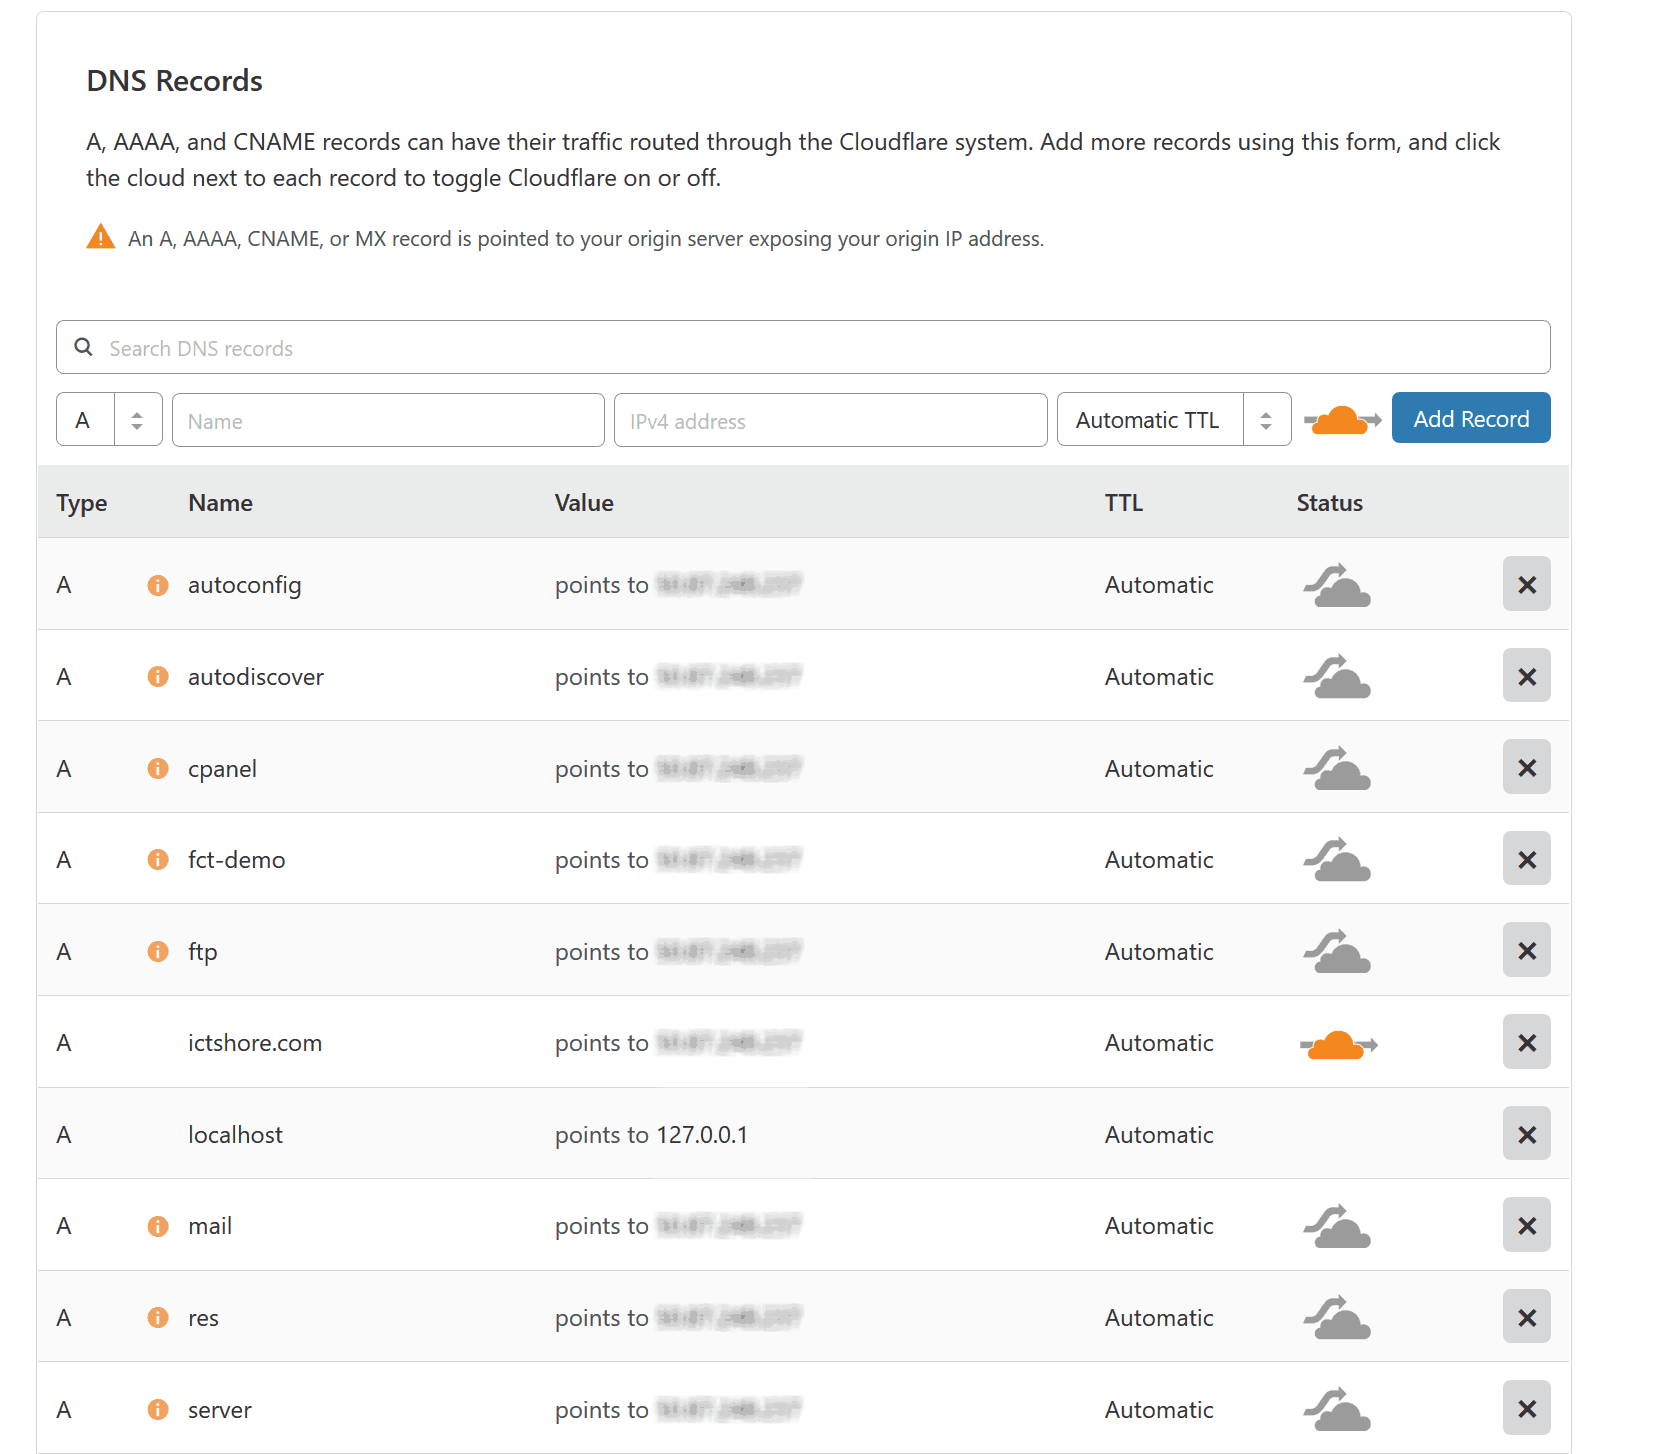
Here in CloudFlare we have a very nice panel to play with our DNS entries. We can create all DNS entries that we could on any other DNS provider, plus the CDN entry. The CDN entry simply means “Apply this resolution, but send the traffic through the CDN first”. Effectively, you are caching content for that entry.

The DNS panel is easy to use in CloudFlare. You simply have an entry (the name), that points to IP addresses (or another names in case of CNAME entries). For each entry, you see the status column. This indicates if the traffic is sent to the CDN or not. The arrow in the orange cloud means that traffic goes into the CDN. Instead, the arrow that goes above the cloud, means traffic is sent directly to your servers, without CDN.
What do I send inside the CDN? CloudFlare can be your CDN for any kind of web content you have. Thus, all URLs pointing to websites should go through the CDN. CloudFlare is smart enough to understand the type of HTTP traffic and let POST requests go through. In other words, the CDN will not break your interactive content. However, some protocols are not cachable, so the CDN will not work for them. That’s the case of emails, with SMTP or IMAP. In fact, you can see the mail entry does not go into the CDN.
As a rule, everything that is web goes inside the CDN, everything that isn’t don’t.
In Conclusion
Setting up a CDN is easier than it seems. Modern tools like CloudFlare makes this process almost completely automatic. Furthermore, with CloudFlare you also get a free SSL certificate exposed by your CDN. If you are in a hurry, I suggest registering with CloudFlare (because there is a free option that works well for most websites) and following their wizard. You will have your CDN ready in minutes.
What do you think about CDNs and CloudFlare? Have you used them? I have been using them on this website for a while now, but I’d love to hear your feedback as well.