Would you like to focus the effort of your team on what actually matters? While there are several options for that, agile is one of the most popular nowadays. That’s because it is fast, simple to implement, and it gets things done. With no surprise, agile is now at the core of any modern development team. Starting to benefit from agile is easy, you just need to learn the basics of agile planning. This post will teach you exactly that, and we will see how to apply that planning to real-life software development. To do that, we will use Azure DevOps agile tools.
Introducing Agile
What is Agile Planning?
Agile planning is just a project management method. Even if it is really popular in the IT industry, it finds usage in literally any industry. That’s because it is not a new way of approaching software development, it is a modern way to approach work.
The goal of Agile Planning is to minimize the time between thinking and building something. In other words, it wants to shrink the time needed to create something: a feature in case of software. Traditionally, achieving a milestone could take months if not years. Instead, with Agile the target is much closer: days or weeks. Of course, this does not mean you have to do in a day the work you used to do in a month.
What this really means is that you have to reduce the size of your deliverables. To restate that in plain English, you need to break your main goal into smaller and smaller ones, until you have targets that you can achieve in weeks if not days.
Agile Planning in the software industry
Breaking targets into smaller tasks and activities is not a new thing. For the ones of you already working in project management, it just meant creating a WBS (Work Breakdown Structure). However, with agile planning, we have one key difference. In fact, we are not simply breaking down the work into tasks. We are breaking down deliverables into small deliverables, that we can still ship to the user.
In other words, at the end of your days/weeks of work, you must produce something you can release to the users. Something that adds functionality to the users. It could be as simple as the “Export to PDF” of the invoices, or a new dashboard on a website. Instead, with traditional project management, you used to break down the work into milestones with no meaning for the user.
Having this approach allows you to bring something new to the user in a few days and weeks. This is very important for a business perspective, as it minimizes the waste of work. In fact, you can quickly see if the user likes a feature, and continue pursuing its enhancements only if they actually do. This process comes from lean manufacturing, and it is well described in The Lean Startup, by Eric Ries.
Agile Planning
Now it is time to put our wonderful Agile to work. Before we do that, we should understand the components of an agile plan.
The components of Agile
For agile planning, you can structure your work into several components. It is important to know these terms, as they ensure you speak the same language of other Agile project managers.
- A User Story is the description of a feature from the point of view of the user. It could be as simple as “I want to download the PDF of my invoices”. You can read more about user stories here.
- You can break down a user story into tasks, small batches of works lasting a few hours to remember what needs to be done to achieve the story.
- Instead, a release is a group of user stories that together form a new product or the update of an existing product. You may be familiar with this term (e.g. upgrading from release/version 1.0 to 2.0)
- A sprint or iteration is a group of user stories that you should implement within a specific timeframe (usually 1-2 weeks). A release contains several sprints.
- Many tools implement boards. A board is a visual group of stories (represented visually as cards), grouped by type or status (e.g. active or closed).
We are not talking about complex project management lexicon. Instead, these are just the standard terms we use to describe simple concepts. You will find these terms in all project management tools with agile planning.
Agile Planning in Azure
As you will see, Agile Planning is very easy to do, provided you have the tools. Since we focus on software here, Azure is one of the best choices. It is free, in the cloud, and integrated with the source control. That’s why we will use Azure DevOps agile tools, or their boards to be specific. If you want to set up a project on Azure, you should read this tutorial first. Among other things, it will show how to set up your account.
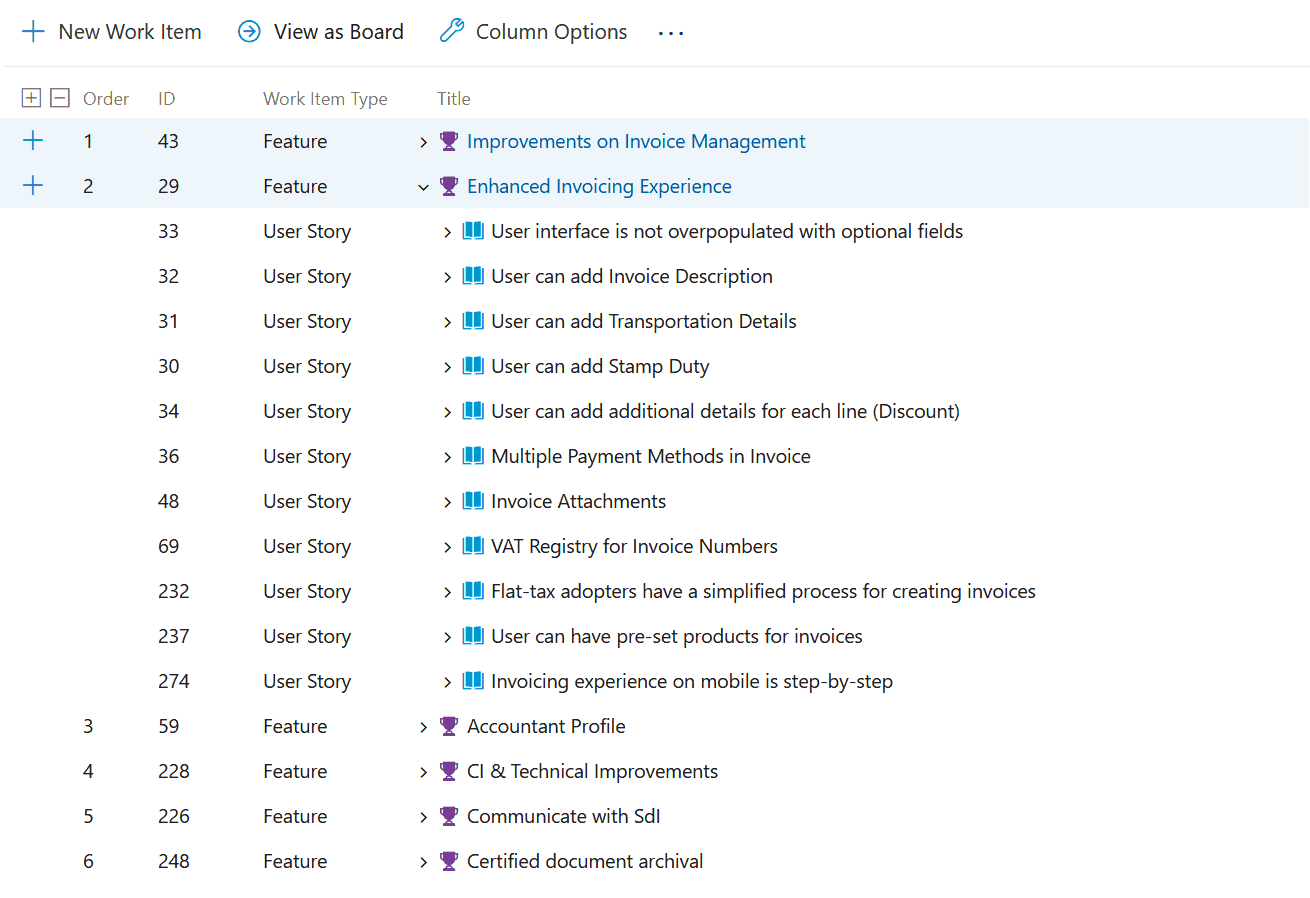
Once you have a project ready, you can go into the Boards section of your project and navigate to the backlog. Here, you can create work items (features, user stories, or tasks). For Azure, a Feature is just a group of related user stories.

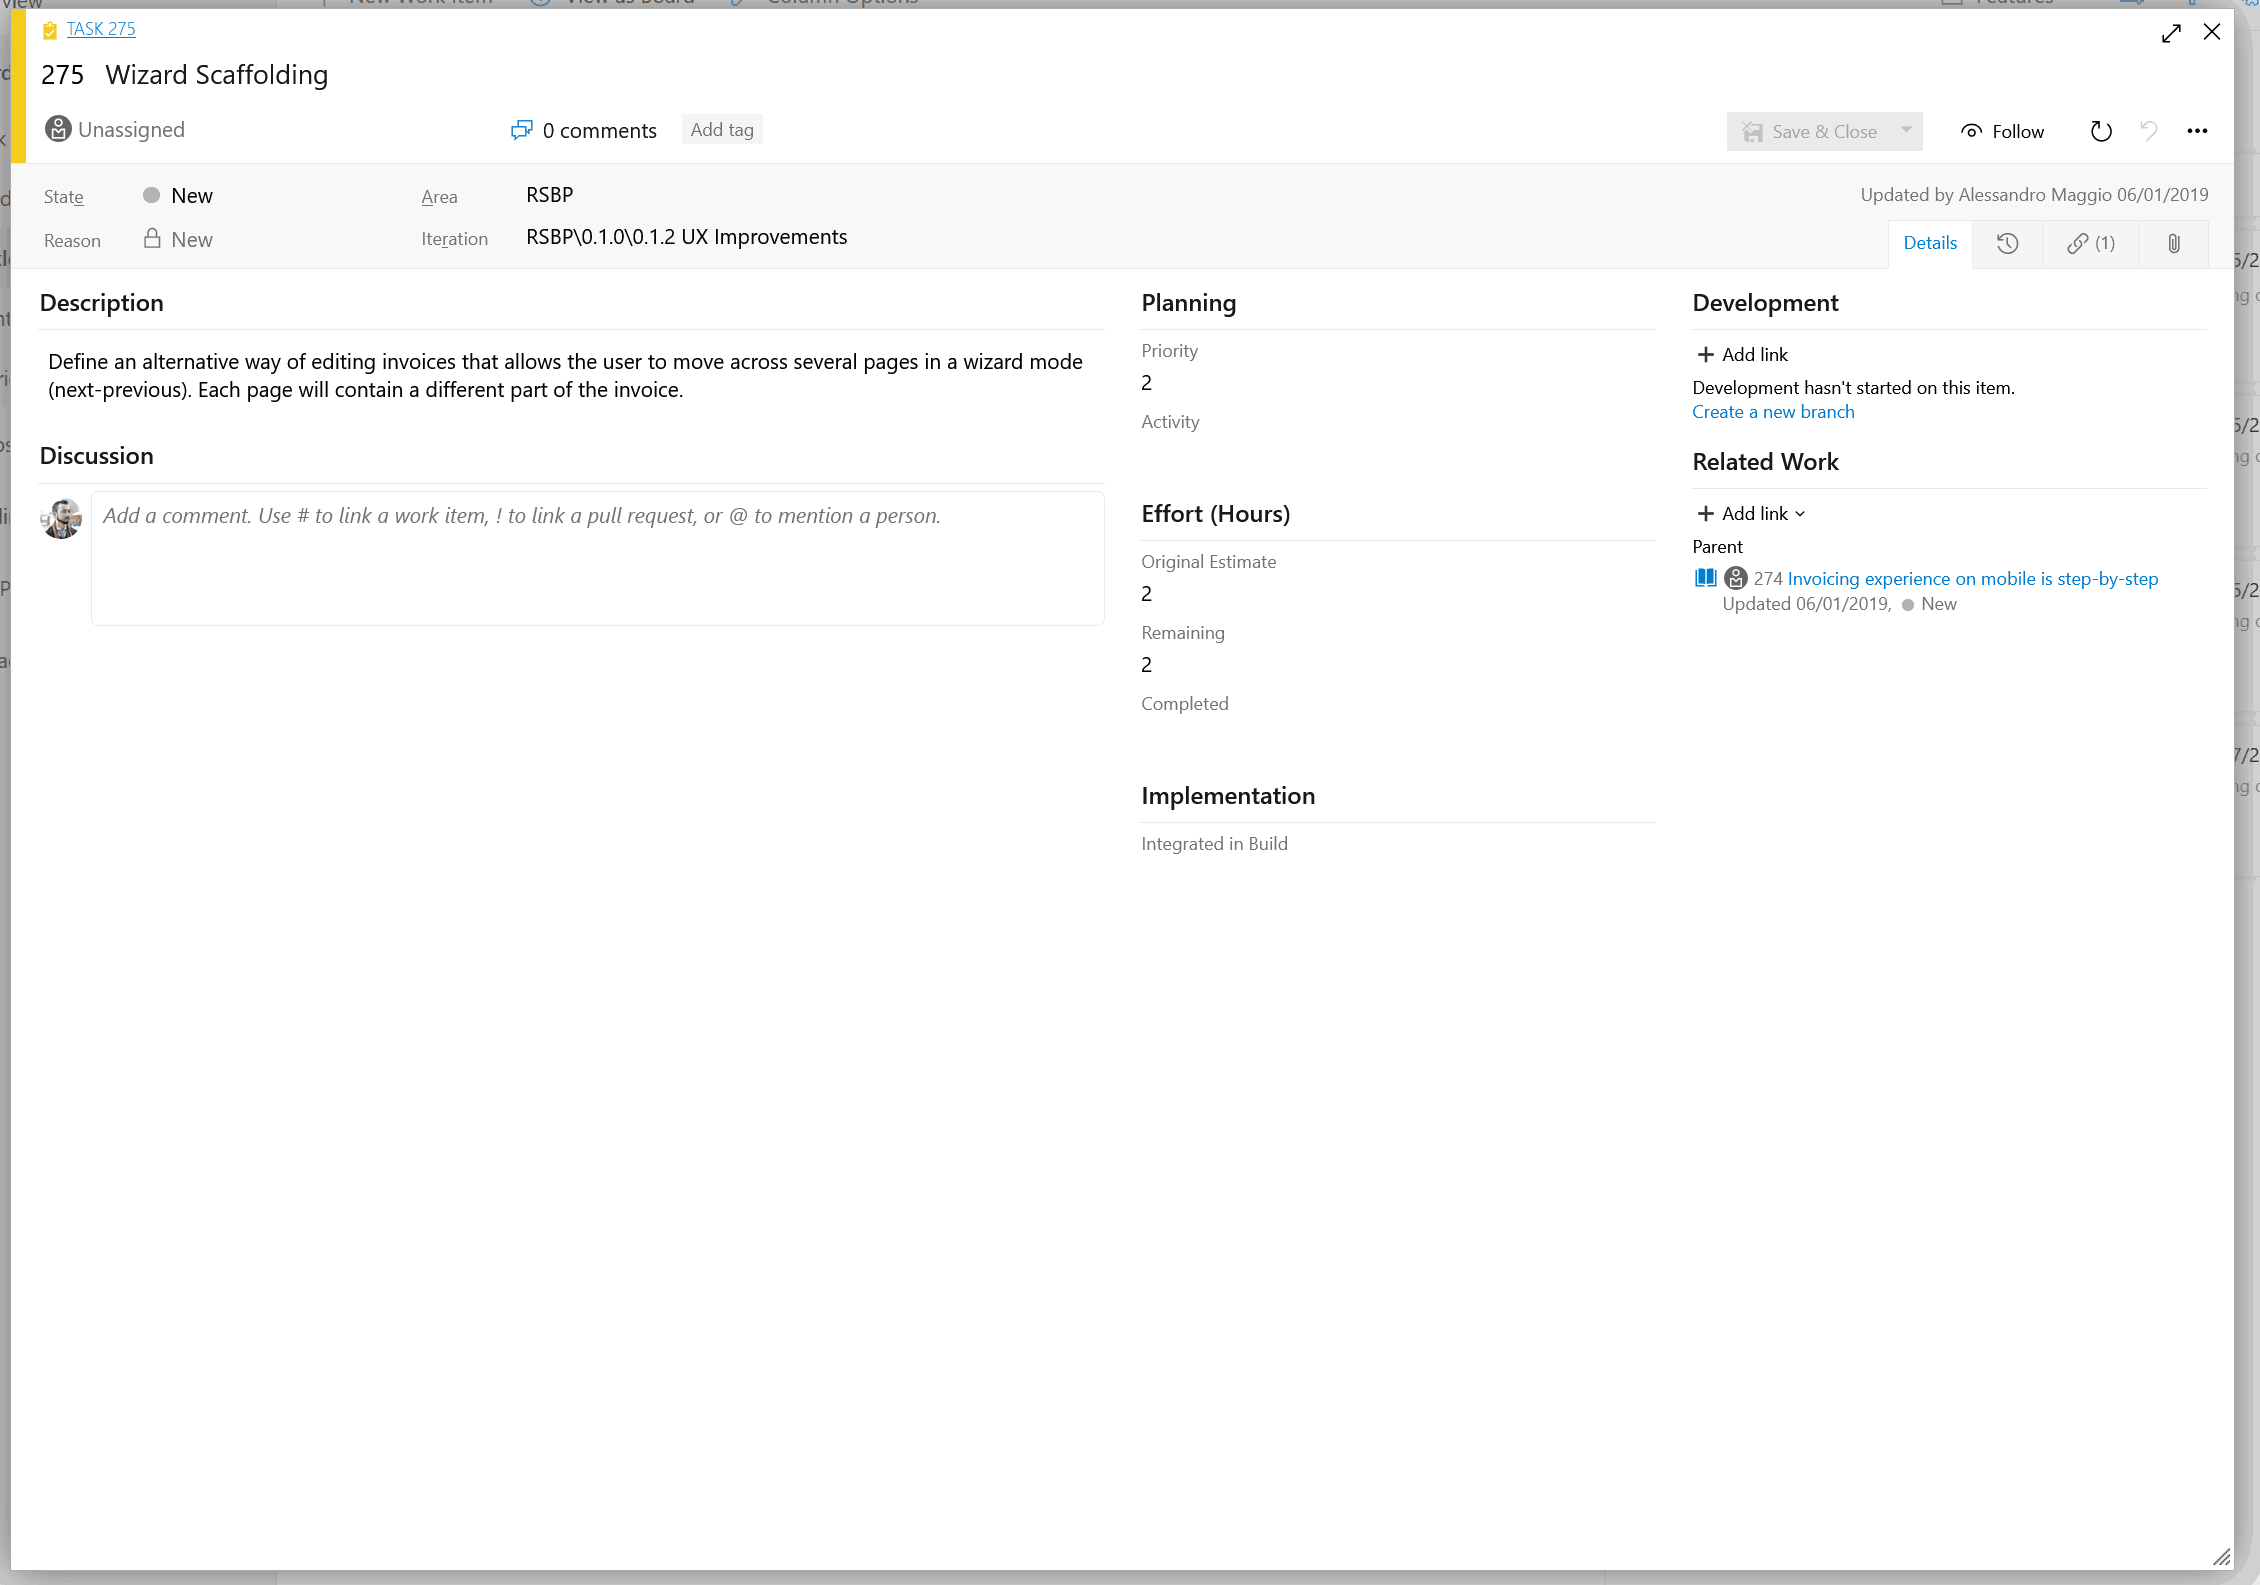
Once you created user stories and you have grouped into features, you should create tasks inside user stories. To do that, you need to tune the Related Work section. Another important thing is to insert the Original Estimate of time (in hours), the remaining work and the completed work. When you start out, the remaining work will be identical to the original estimate, as you haven’t done any work yet. As you progress with work, you will have to increase the completed work and decrease the remaining. It is very important to use these fields, you will be able to do some good analysis of your work.

Preparing the Sprints
Now you have a list of user stories to implement. You also know how to implement each, as you have defined the tasks. However, we haven’t defined how to proceed yet, and we don’t know the priorities. All our stories are in the backlog, so they are ready to be scheduled. We need to make some decisions and move some of our stories to a spring. You are the only one to know the priority, and you should put inside a sprint the stories you need to implement first.
Before we do all of that, we need to create the sprints. We can do that by navigating in the Sprints sections inside Boards. Then, we can click on “New Sprint”. We need to give it a name, a date for the start, for the end, and the Location, which is the Release this sprint belongs to. Once we have the sprint, we need to assign user stories and tasks to it.
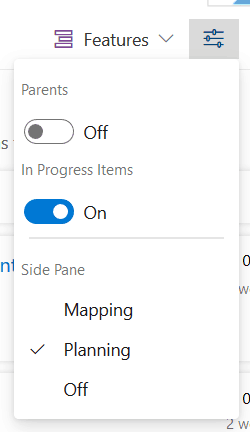
To do that, we go back to the backlog section. Using the menu on the right, we ensure to display the planning docked to the right of the screen.

Then, you can drag-and-drop features, stories, and tasks from the backlog (on the left) inside one of your sprints, that will appear on the right panel. Note two things here: first, you have to move items individually. If you assign a story to a sprint, it does not mean that its tasks belong to the same sprint as well. You have to assign the tasks as well. The second thing to remember is that items won’t disappear from the list on the left. That list is just the full list of items, assigned or not.
Keeping track of work
Now that we have the list of sprints and tasks inside them, it is time to work with them. As you work on stories and tasks, you should remember to update them inside Azure. If you spent some time on a task, add it to its completed effort. Also, don’t remember to reduce the remaining time. Most importantly, mark a task as active when you start working on it, and resolve/close it when you are done. By setting a task into the closed state, you are effectively forcing the remaining time to zero.
To do all of that, you can use the boards. Just select your desired sprint and view it as Taskboard (in the top left). You will be able to drag items between states (from open to active, from active to closed).
The burndown chart
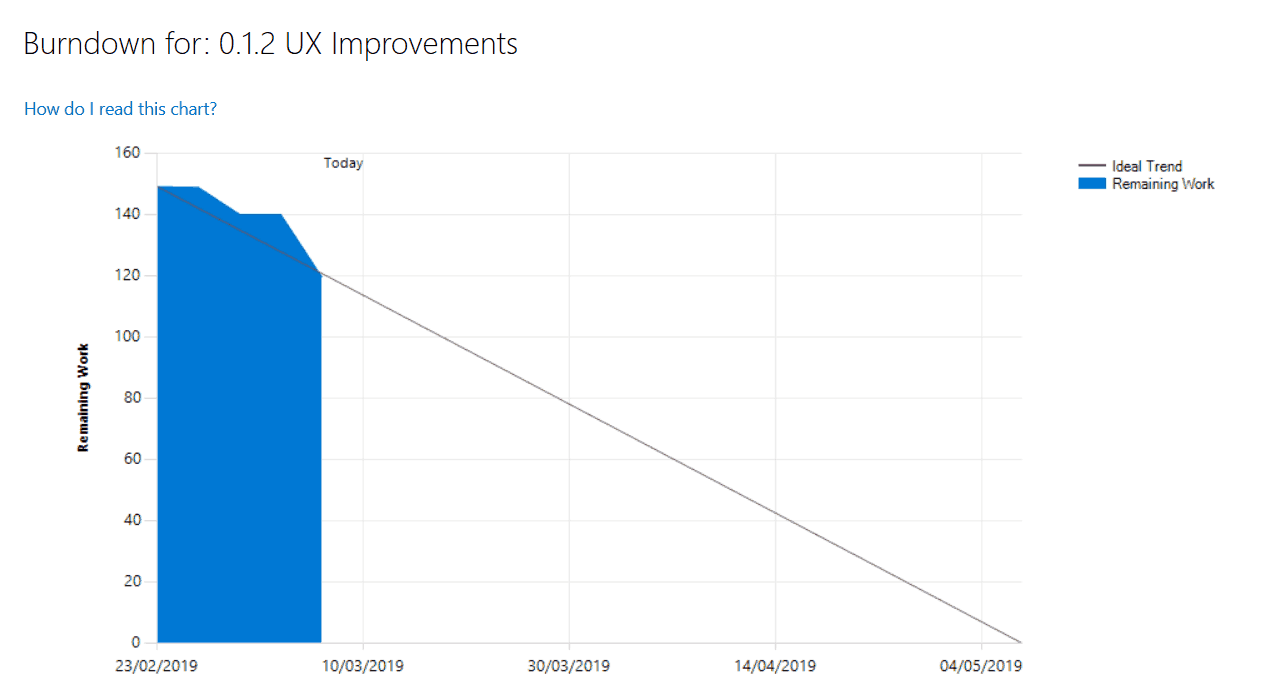
This is where our agile planning gets magic. At this point, we have a set of stories and tasks, all grouped into sprints. We know the date when we need to start working, and our end date (the deadline). We also know the effort we expect for each individual task. This means Azure DevOps can start to plot meaningful information to us. If you navigate to the sprint section and select the current sprint, you will see one small chart in the top right. Click to enlarge it, and you will see something like this.

The burndown chart allows you to quickly grasp if you are on time. First, it plots a black line representing the ideal trend of work. This line represents the number of hours of work left. As you can see, it decreases linearly as time progresses to the deadline. The other information we have is the actual remaining work, the way we are actually performing. This appears in the chart in the form of a blue area. This is up-to-date with your current status of tasks and stories. The more we stay above the ideal trend line, the more we are in delay (we have more remaining work to do than planned). Instead, the more we stay below the line, the more we are anticipating the deadline.
In this example chart, you can see we started by making almost no work (the blue area did not shrink), and then we made one big effort on the last day to be back on track again.
Some final words
In this article, we quickly presented agile planning and why it can help you increase productivity. To get you started, we showed how to implement agile in software development with Azure DevOps.
This is just the tip of the iceberg. While agile planning is really simple, you have many tools out there that can suit your needs. Most importantly, you can adapt the concepts of agile to any industry, and – to some extent – to personal life as well. The key concept to remember about agile is the following.
Divide your work into batches that last only a few hours. Split your deliverables into smaller ones that you can deliver in less than a month, and ensure those deliverables are meaningful to the end-user. Ship the deliverable, get feedback from the user, and adjust your next iteration accordingly.
Now, getting feedback from the user does not barely mean asking “what do you think?”. More often than not, users are not sure about what they want. Instead, it means measuring how users react to your new release. For software, that could be as simple as seeing an increase in the time spent on the software.
Just start with Agile Planing, and see how it goes. Of course, let me know what happens along the way.