To many of us, IPv6 is a heavy topic, since it disrupts some common concepts. However, we can’t delay its adoption forever: better to be ready. Therefore, you need to know how to use IPv6, configure, and troubleshoot it. This lab is an IPv6 challenge, as we challenge you to integrate three core components of IPv6: SLAAC, Transit networks, and OSPF for IPv6. Not only you will consolidate your IPv6 skills, you will also prepare for the CCNA.
Since this lab focuses on implementation, we ship it with a lab. Use the link below to download the lab for free!
Just download the lab, and unzip it. Then, open this IPv6 Challenge with Cisco Packet Tracer. Then, just read the requirements and try to implement this lab on your own.
Skill Integration: The IPv6 Challenge
This lab is a Skill Integration Challenge. As you would expect, this IPv6 challenge sees you configuring the devices on your own. We won’t give you a step-by-step tutorial, and we won’t explain to you what’s happening. Instead, we will give you some detailed requirements about what needs to be done. Only with them, you can complete the lab. In case you struggle, however, don’t worry: we have the complete solution right below, with all the commands you need to type.
However, be aware that we won’t give any detailed explanation about these technologies. In case you need it, you should check these articles.
- Network Layer: IPv6 addressing and IPv6 protocol
- DHCPv6 Configuration: SLAAC, Stateless and Stateful
- OSPFv6: Configuring OSPF for IPv6 on Cisco routers
Lab Topology
The topology for this lab is quite simple, as you can see.
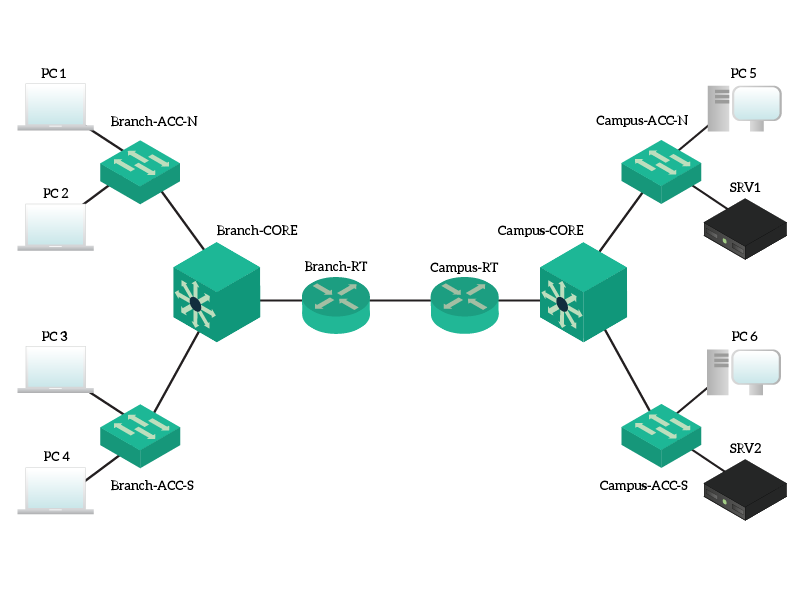
We have two campus networks, connected by two routers on a single path. On the left, we have a branch network with all the devices (only clients) on the default VLAN. On the right, instead, we have the main site with two servers. That site hosts clients in a VLAN (150), and servers in another (100).
The Requirements
For this lab, our ultimate goal is to have clients on Branch able to browse in HTTP both SRV1 and SRV2. However, to do that, we have several constraints. Follow this step list when implementing the lab.
- Both routers (Branch, Campus) should behave like Router on a Stick (RoaS). The subinterface ID must be the same as the VLAN ID, including where the default VLAN is in use. The locally significant address of the router must always be
::1, and the same is true for the globally significant address. For global addresses, refer to the following table below. - Clients should get addresses with Auto-Configuration (they are already configured this way). However, the routers must give them two extra information, as listed below. The DHCP pool name should reflect the third word in the Global Unicast address, all uppercase. Create a scope for each subnet of clients, and specify:
- DNS server, which should be
2001:DB8:BEEF::11 - The domain name, which should be
XXXX.company.local, where “XXXX” is replaced by the third word in the Global Unicast address, all lowercase. - Configure a transit network,
2001:DB8:BC::/64, where Branch will be::B1and Campus will be::C1. Implement Link-Local addresses accordingly. - Configure OSPF using a PID of 1, adding all networks to the backbone area. The router should not send OSPF traffic on any interface by default, and you must manually remove this configuration from the transit network connecting the two routers. As router IDs, use
1.1.1.1for Campus, and2.2.2.2for Branch.
- DNS server, which should be
| VLAN Name | VLAN ID | Address | Prefix-Length |
|---|---|---|---|
| Campus Servers | 110 | 2001:DB8:BEEF:: | 64 |
| Campus Clients | 150 | 2001:DB8:ACAD:: | 64 |
| Branch | 1 | 2001:DB8:CAFE:: | 64 |
Now, you have everything you need to know! Try to implement it, good luck! In case you don’t see the awesome 100% at the end, and you struggle to troubleshoot, just read on for the solution.
IPv6 Challenge: Integrating SLAAC, Transit Networks and OSPF for IPv6
#1 – Configure Inter-VLAN Routing
The absolute first thing you want to do when working for IPv6 is enabling it. Then, you will need to define a subinterface for VLAN 1 (.1) on Branch, and two on Campus: VLAN 100 (.100) and VLAN 150 (.150). Don’t forget to specify that VLAN 1 is native. Then, fill with the IPv6 addresses according to the requirements.
Add these commands on Branch-RT…
ipv6 unicast-routing

interface GigabitEthernet 0/2.1
 encapsulation dot1Q 1 native
 ipv6 address FE80::1 link-local
 ipv6 address 2001:DB8:CAFE::1/64
And these on Campus-RT…
ipv6 unicast-routing

interface GigabitEthernet0/2.100
 encapsulation dot1Q 100
 no ip address
 ipv6 address FE80::1 link-local
 ipv6 address 2001:DB8:BEEF::1/64

interface GigabitEthernet0/2.150
 encapsulation dot1Q 150
 no ip address
 ipv6 address FE80::1 link-local
 ipv6 address 2001:DB8:ACAD::1/64
#2 – Configure SLAAC
IPv6 Auto-Configuration means SLAAC, but since we are using some extra information we call it stateless DHCPv6. According to the requirements, we need to create one scope per router. To do that, we need to take the third word of the global addresses of the client subnets: acad and cafe. Then, we can use them when creating the scope. Right after that, we need to associate the scope to each interface and set the ND flag.
The ND “Other Config” flag will tell clients to ask for extra information and get DNS and domain name. So, type that on Branch-RT…
ipv6 dhcp pool CAFE
 dns-server 2001:DB8:BEEF::11
 domain-name cafe.company.local

interface GigabitEthernet 0/2.1
 ipv6 dhcp server CAFE
 ipv6 nd other-config-flag
And that on Campus-RT.
ipv6 dhcp pool ACAD
 dns-server 2001:DB8:BEEF::11
 domain-name acad.company.local
interface GigabitEthernet 0/2.150
 ipv6 dhcp server ACAD
 ipv6 nd other-config-flag
#3 – Configure Transit Networks
Configuring transit networks is fairly easy. Since we have two routers on a single link, we will use only a single transit network. Following the requirements, you should type that on Branch-RT…
interface GigabitEthernet 0/0
 ipv6 address fe80::B1 link-local
 ipv6 address 2001:DB8:BC::B1/64
And that on Campus-RT…
interface GigabitEthernet 0/0
 ipv6 address fe80::C1 link-local
 ipv6 address 2001:DB8:BC::C1/64
#4 – Configure OSPF
Finally, we have to configure OSPF. To do that, we need to strictly follow our requirements. We are going to use a process ID of 1 and put all interfaces in Area 0. To follow the best practices, as by requirements, we will turn on the “Passive Interface” feature as default. This means that, by default, OSPF won’t send nor receive updates on any interface. Then, we will remove that feature from the transit network only: GigabitEthernet 0/0. We will also need to specify router IDs, and tell for which interfaces do routing for.
To do all of that, start by typing these commands on Branch-RT…
ipv6 router ospf 1
 router-id 2.2.2.2
 passive-interface default
 no passive-interface GigabitEthernet0/0

interface GigabitEthernet 0/0
 ipv6 ospf 1 area 0

interface GigabitEthernet 0/2.1
 ipv6 ospf 1 area 0
And finish with these on Campus-RT…
ipv6 router ospf 1
 router-id 1.1.1.1
 passive-interface default
 no passive-interface GigabitEthernet0/0

interface GigabitEthernet 0/0
 ipv6 ospf 1 area 0

interface GigabitEthernet 0/2.100
 ipv6 ospf 1 area 0

interface GigabitEthernet 0/2.150
 ipv6 ospf 1 area 0
Some thoughts
And now, congratulations! At this point, your score should be 100%, if it isn’t just read again the solution, and find what was missing in your implementation.
Before letting you go, we should talk about this design. As you can guess, this design does not follow a real implementation: it was specifically created to meet lab needs. As you can see, there is no real benefit in having such transit: routers merely connect two sides of a network. In real life, you would do two things:
- If sites are close enough (like two contiguous buildings), collapse everything to a single core, saving a lot of money in hardware
- If sites are far away, connect your routers to an MPLS network or even to the Internet (of course, implementing the adequate level of security)
Keep this in mind when designing a network. If you are doing that with IPv6, it means you are working with a modern network. So, it should modern and well designed. Take your design choices carefully, always thinking about how to scale.
What are your thoughts on this lab? Was it hard? Did this IPv6 challenge really challenged you, or are you ready to take the CCNA? Just let me know in the comments.