Software-Defined Networking is shaping the future of network engineering. Because of that, anyone in the field must learn how to deal with it. With SDN, the network becomes a simple service for the application. Any application can require the network to change and evolve, and engineers make more high-level designs. To do that, you need to use SDN software. In this article, however, we are going to explain how to verify the functionalities of any SDN software for free. We will learn the testing of an SDN software with GNS3, an awesome network simulator. This comes handy if you plan to create your own software as well.
Why testing SDN software?
In the world of development, there is a say: if it is not tested, it doesn’t work. We can apply this concept here indeed. An SDN software will control your entire network, having even more power than a human administrator. All this power must come with some responsibility. In other words, we need to be sure that everything is working. If it isn’t, it is not like shooting in your own foot. It is like nuking in your own foot.
If it is not tested, it doesn’t work.
Thus, this article explains how you can deploy SDN in a virtual environment. We will see how to connect the SDN software to virtual devices, so we can even blow them up – no harm to the real network!
Who should read this article?
I suggest this article to any network engineer who wants to jump on the SDN trend, but some of us will find it more helpful than others. In fact, if you are working on a Proof of Concept for an SDN software, this article can help you a lot. Or, if you are trying to develop your own SDN software, this will be what you were looking for. Chances are, you may be following our sdncore project: a set of tutorials explaining how to write an SDN software from scratch in Python. You may want to check out the beginning of the project and our github project as well.
What about GNS3?
GNS3 is a Network Simulator where you can emulate many network devices on your computer. You can run Cisco, Juniper, Fortigate, Palo Alto, and even more by connecting it to VirtualBox. With GNS3, you have an enterprise-grade network on your laptop. The cool thing about this tool is that it is completely free and open source.
We have several articles about GNS3 here on ICTShore.com. If you are brand new to this tool, this beginner article is the best place to start. Otherwise, you may just check the download page.
So, our goal here is simple. We want to run the SDN software on our PC and connect it to our virtual network in GNS3. This way we can see if it is working as we expect it. If you have an SDN appliance (that is, a custom operating system to do SDN) have no worries! You can deploy it in a virtual machine and connect it to GNS3 as well.
Preparing your PC for connecting to GNS3
By connecting GNS3 to your own PC you can have your applications talk with and through the GNS3 network. We call this host connection because your PC is hosting GNS3 after all. With this awesome feature, you can have the SDN software on your PC and connect it to the network. To do that, we need to create a virtual network interface on your PC that touches GNS3.
To picture this, your PC will have a wired or wireless connection to the Internet. This is a physical device. We are going to create a virtual one that connects to the GNS3 network. Doing that is easy, both with Windows and Linux.
The Microsoft Loopback
Windows offers a special type of loopback interface, the MS-Loopback. This is a virtual interface that allows applications to talk with each other, exactly what we need. You already have the software on your PC to create this interface, you only have to do it. Thus, open the command prompt as an administrator (very important!). Then, run the following command.
hdwwiz.exeThis will open a special window to install legacy devices. Our MS-Loopback is quite old indeed. In this window, simply click next, and in the next screen select the Advanced mode.
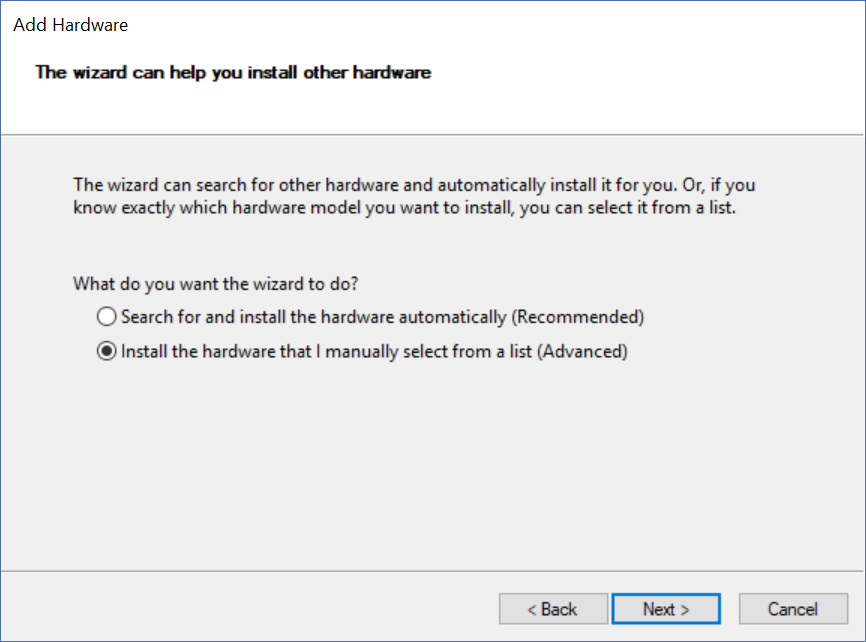
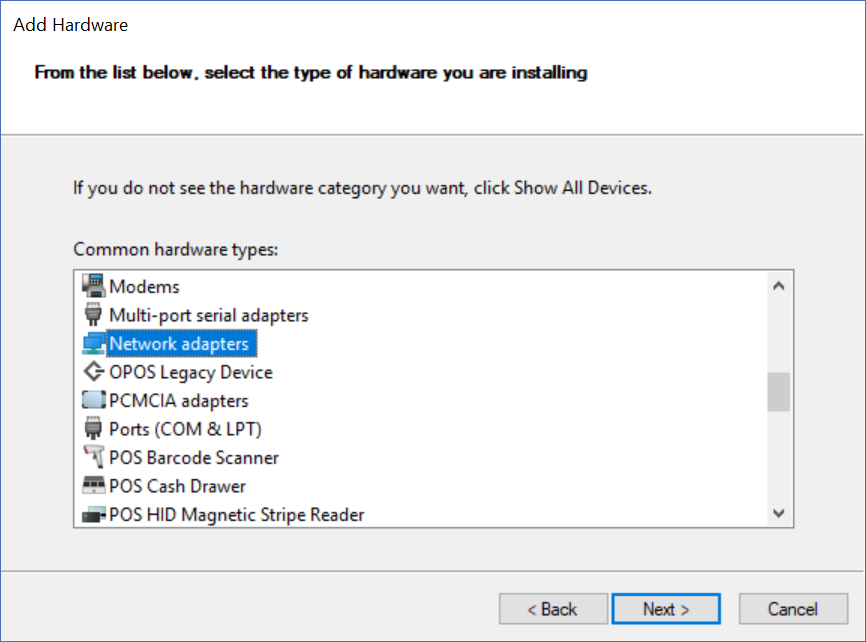
After that, you will find a list of categories of devices. You need to scroll down to Network Adapters.
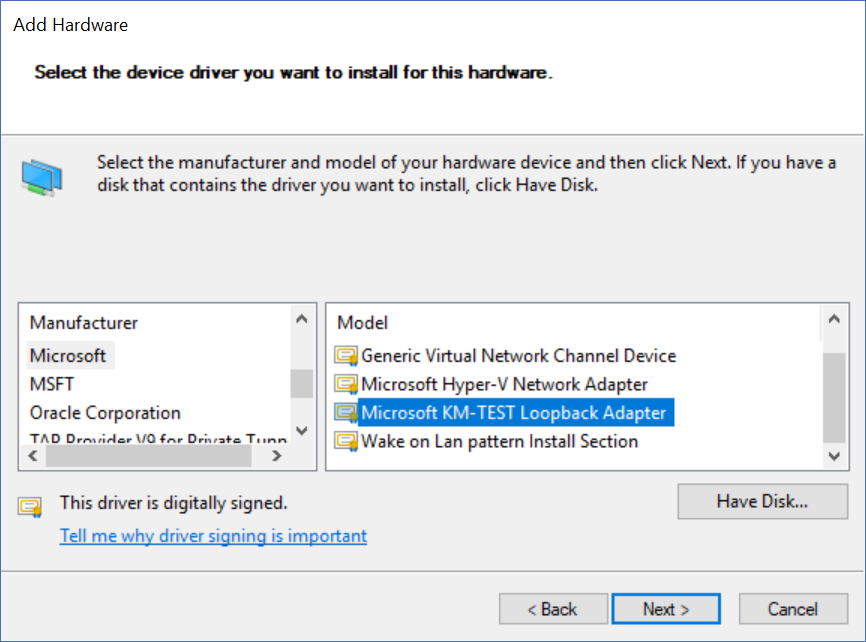
After clicking Next, it will take a few seconds to list all possible devices. On the left menu, select Microsoft as the Manufacturer. This will change the options in the Model field. Then, select Microsoft KM-Test Loopback Adapter on the right field.
You will see a recap where you have to click Next again. The installation will begin and finish in a few seconds. This applies to the latest versions of Windows, and specifically to Windows 10. You can consult this TechNet page for more info about other systems.
Tuning our MS-Loopback interface
Once you install the loopback interface, it will be a network card like all the others. However, we need to assign an IP to it. Since our PC is a home PC and typically works in the 192.168.1.0/24 network, we can use addressing from the 10.0.0.0/8 range. In our case, this will avoid any problem, but you need to check your own network settings to be sure.
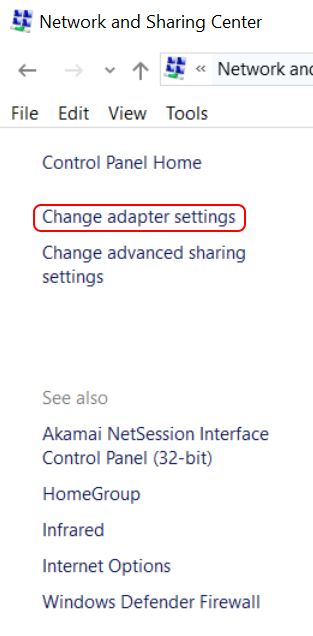
To change the settings, open the Control Panel and navigate to Network and Internet > Network and Sharing Center. From there, on the left column select Change adapter settings.
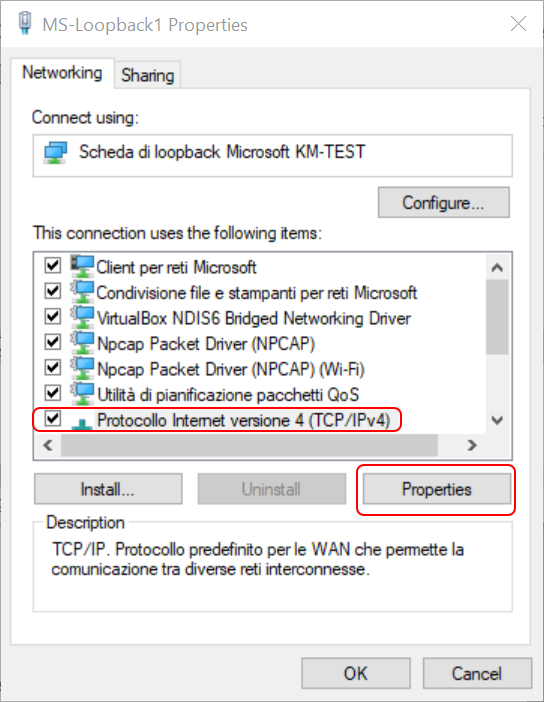
Here you will see the list of your interfaces. If you feel like a standard user, you are going to see just a few: Wired, Wi-Fi, and Bluetooth. However, if you have been working with GNS3, VirtualBox, and/or Wireshark recently you know you will see a little mess. No problem, you need to look for the NIC that has Microsoft KM-TEST loopback adapter as Device Name. Its name is going to be “Ethernet N” by default, where N is the number. You can rename it the way you want, I named it MS-Loopback1. Then, right-click on the interface and select Properties.
From this page, scroll down to Internet Protocol version 4 (TCP/IPv4), select it, and click Properties.
Here we are. Now, set the IP to be static and not obtained automatically. Configure it with the IP you want, and optionally specify DNS settings. For our test, we didn’t.
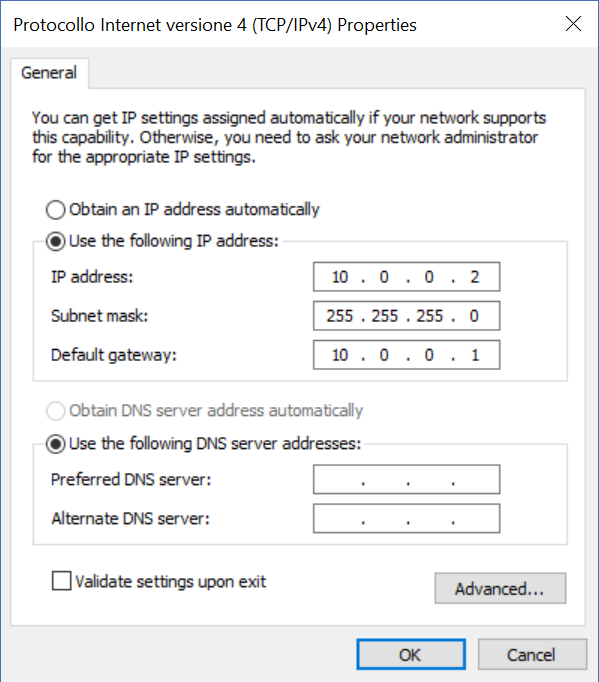
Of course, you need to use a valid IP in the GNS3 topology.
Adding a loopback interface on Linux
Adding a loopback interface on Linux is extremely simple. You don’t need to do all the fancy stuff that Windows requires, only give a command. Open your prompt and check the existing interfaces with ifconfig. You are going to see a single loopback interface, named lo. We don’t want to touch it, so we create a new one with this command.
sudo ifconfig lo:1 10.0.0.2 netmask 255.255.255.0 upIn case the interface lo:1 already exists, you can create lo:2 or any other number.
IP address considerations
When configuring the loopback interface, you need to specify a valid address. This must be an address that fits in the GNS3 topology, and that the devices in GNS3 will understand. If you are following this tutorial, you are likely to have the knowledge to plan this correctly.
Later, we are going to add a virtual router in GNS3 with the address of 10.0.0.1. By connecting this router directly to our PC in GNS3, the two will be able to talk with each other. If you use an IP address that GNS3 does not understand, because you haven’t configured the proper routing, it won’t work. The traffic will get to GNS3 but will be lost there.
Bridging our PC (and the SDN software) to GNS3
Now that the PC is ready, we need to tell GNS3 to talk with it. If we do that, we can then use our SDN software on the enterprise network. To do that, open GNS3 and from the list of all devices add a cloud to the network.
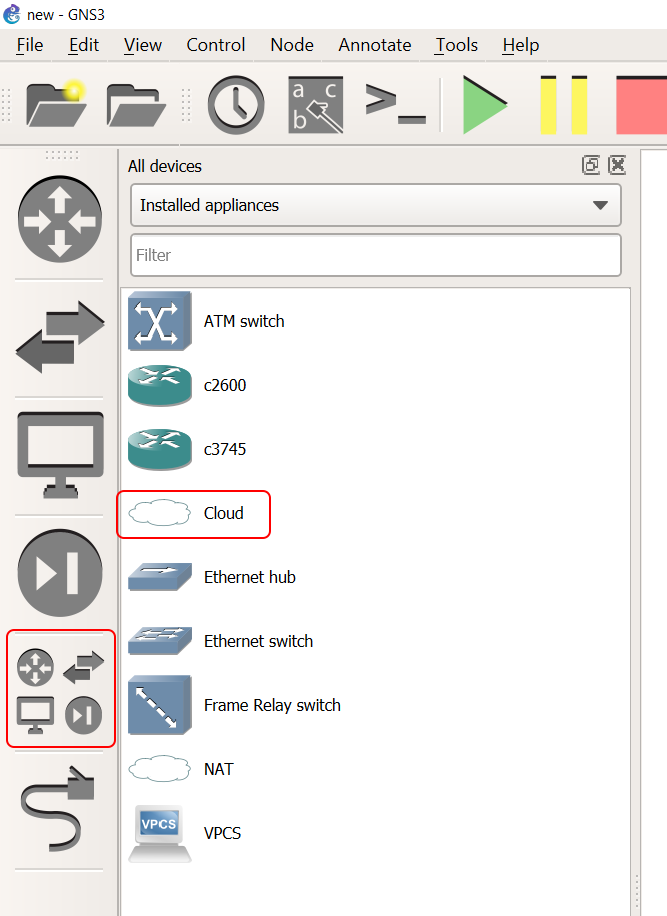
To add it, simply drag it into the project. Then, right-click on it and select Configure. This is completely optional, but we can do it for clarity. You will see a list of interfaces. These are the NICs on your computer. Remove them all and leave only the MS-Loopback1 (the name we give it, you may have used a different name), the one we created so far. You want to see something like this picture and click Apply, then OK.
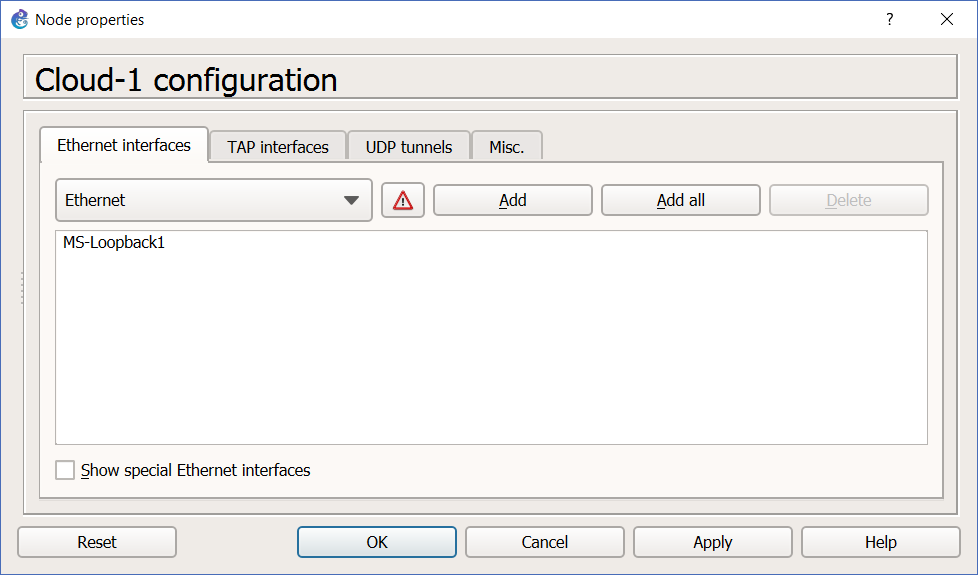
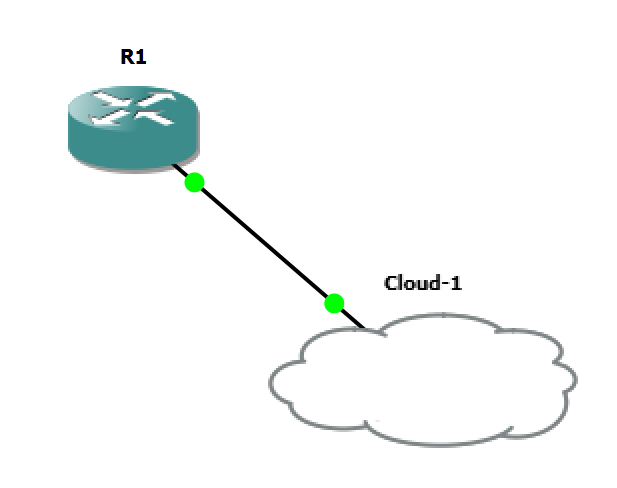
At this point, you can drag a router into the picture, connect it to the cloud and we are done. If you configure the router, it will take with the cloud.
Configuring the router
We started this article with a simple statement.
If it is not tested, it doesn’t work.
Now we can honor this statement by testing what we did. We need to configure the router with some sample settings so that we can see if it can ping our PC, and vice versa. Furthermore, we are going to see if we can launch a telnet connection. Since we used the interface FastEthernet 0/0, we can give the following commands to our Cisco router.
username admin privilege 15 password cisco
enable secret cisco
banner motd ^SDN Testing router^
!
interface FastEthernet 0/0
 ip address 10.0.0.1 255.255.255.0
 no shutdown
 exit
!
line vty 0 15
 transport input all
 login local
 end
!
Now, we can ping our PC.
Type escape sequence to abort.
Sending 5, 100-byte ICMP Echos to 10.0.0.2, timeout is 2 seconds:
.!!!!
Success rate is 80 percent (4/5), round-trip min/avg/max = 8/9/12 ms
We can also telnet from our PC to the router.
C:\Users\aless>telnet 10.0.0.1

SDN Testing router

User Access Verification

Username: admin
Password:
R1#
Some common problems
Connecting your PC to GNS3 can be a real pain. Sometimes you do everything correctly, yet it doesn’t work. If you are like me and need this setup for developing your SDN software, you need to overcome this.
I found that the best approach is to use Dynamips routers instead of the GNS3 VM. I’ve also found that the GNS3 VM itself may mess the setup sometimes. If this is your case, and you are sure everything is correct, don’t panic. Try reinstalling GNS3, and trust me, this is a real lifesaver. Sometimes it might get buggy, and you might need to do that. Don’t lose your time in troubleshooting something so simple that it should be already working.
A bonus tip on routing
In this setup, our PC knows that everything about 10.0.0.0/24 is on GNS3. It doesn’t know anything else, and if we want to add other routers behind R1 we can’t reach them from our PC. This is because routes are missing. We can simply fix it by adding a route. On Microsoft this is simple, you can use the route add command.
route add 10.0.0.0 mask 255.0.0.0 10.0.0.1With this command, we are telling our PC that the entire 10.0.0.0/8 subnet is behind 10.0.0.1, our GNS3 router.
Conclusion
Connecting your PC to GNS3 is a real boost when testing networks. If you are working in SDN, it can completely change the way you work. This tutorial will open you several possibilities, allowing you to use your own tools to work on network labs. Everything on your laptop, without purchasing real hardware.
What do you think about this process? Did it work straight away? How do you plan to use the host connection in GNS3 in your labs? As always, let me know in the comments!
