
This Excel macros for beginners tutorial will show you a simple way to create, record, and execute macros in Excel. And, if you are new to macros, it will give you an overview of what macros are, and why they can boost your productivity to a whole new level. In other words, if you use Excel but don’t use macros yet, this is the only tutorial you need.
Excel Macros for Beginners 101
What is a Macro in Excel?
When you open Excel, you can do a lot of things. You can write a value in a cell, write a formula, change the formatting of a cell (color, how the numbers are displayed etc.), copy the value from a cell to another, create a new sheet, and so on. All these things you can do are steps you execute to reach a result.
For example, if you want to find the sum between two numbers, you may do the following steps:
- Write the first number in cell A1
- Write the second number in cell A2
- Write in cell A3 the formula
=SUM(A1:A2)
Of course, this is quite simple, but you can do many different steps and achieve advanced results. If you can articulate these steps clearly and put them in a sequence “do this, then do this other thing, and do this afterwards” it means you can describe them so that someone else can do the same. If that someone else does the same, he will get the same results that you do.
A macro is just like this. It is a set of steps to execute in Excel that you define in advance. Then, it won’t be another person to execute them: Excel will execute them automatically. So, whenever you run the macro, Excel will execute all the steps that you want in a specific sequence.
In the end, a Macro is just a piece of text inside Excel that describes the steps in a specific language (VBA, Visual Basic for Applications). But there is some more Macro terminology for you: writing a macro means manually writing the VBA code to list the steps the macro will execute. Running a Macro means asking Excel to execute all the steps of a Macro that is already written.
Recording a Macro
Other than write or execute a macro, you can also record it. This is often the best thing to do for start, and this is why it is so popular in Excel macros for beginners. Recording a Macro is another way to create your Macro. Instead of writing the code of the Macro itself, you press a “record” button and do things in Excel. Excel will record what you do (which cells you touch, what you do to them, if you add pivots or charts and so on) and then, when you press stop, it will create the VBA code that represents all the steps that you did.
This feature has a great potential. The only drawback is that you have all the steps you want to execute in the right order. If you write the macro yourself, you have time to think and decide what to do when. When recording, instead, if you miss a step you have to cancel the macro and re-record it from the beginning.
Why would you need a macro in Excel?
You can probably imagine that Macros have a huge potential, because they can do everything that you can do as an analyst in Excel. But why would you need macros specifically? Can’t you achieve the same results without macros?
You need macros in Excel because they enable things not found in any other Excel functionality. Specifically, they can do two things. First, they enable step-by-step or sequential computations with complex logic. This means you can calculate something based on the data you have in your file, then after you have this result calculate something else based on it. With plain Excel formulas, you need to lay down all your calculations upfront.
The other important thing that macros can do is that they can manipulate Excel itself, not just the data in it. They can create and destroy sheets, tables, charts, add and remove formatting, add new rows, and so on. You can thus use your Macros to generate additional data (useful in statistics and probability distributions), clean up your sheet, or process some raw input data.
Excel is a powerful tool to store, organize and analyze data, but with its basic features it may have serious limits in how you can process this data. Macros overcome that, and they enable your Excel file to become a fully-fledged application.
Excel Macros for Beginners 102
Now that you know the basics of Excel macros, let’s go deeper with this Excel macros for beginners tutorial and understand how you can actually create them in Excel.
Enabling Macros
Excel can natively run Macros, but the part of Excel that enables you to work with Macros is hidden by default. We need to turn it on. This is free and does not require any additional license, it is just a setting to change, both for Windows and for Mac.
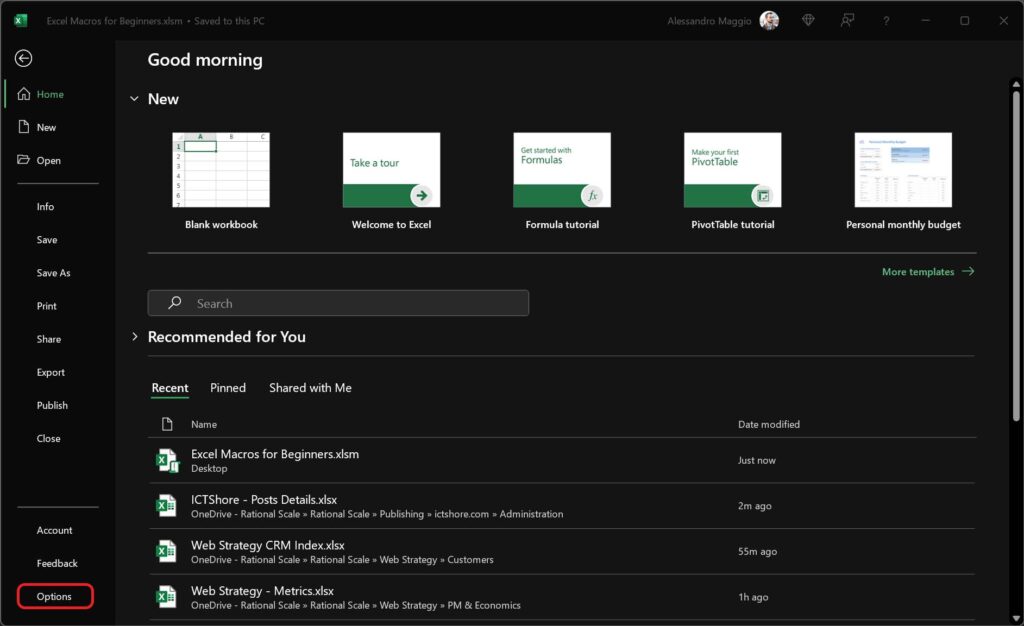
To enable Excel macros for beginners, we need to Show the developer tab. Simply go to File, and then select Options.
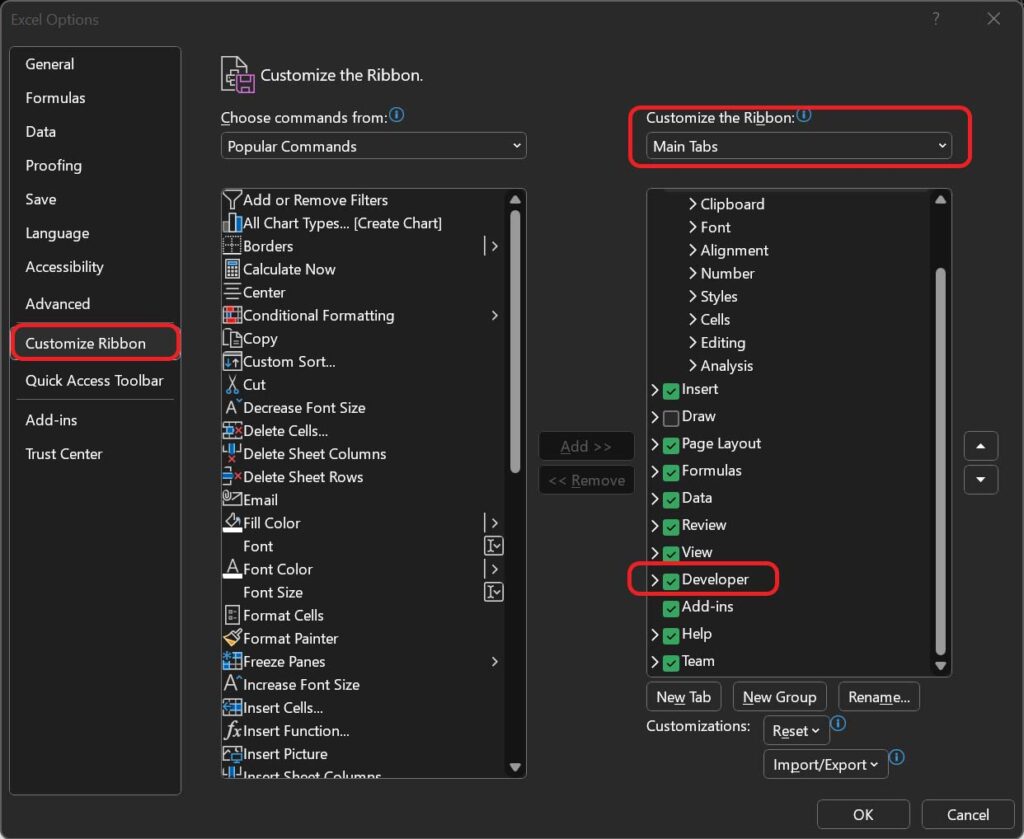
From there, go to Customize Ribbon. Search in the Main Tabs section and check the Developer box.
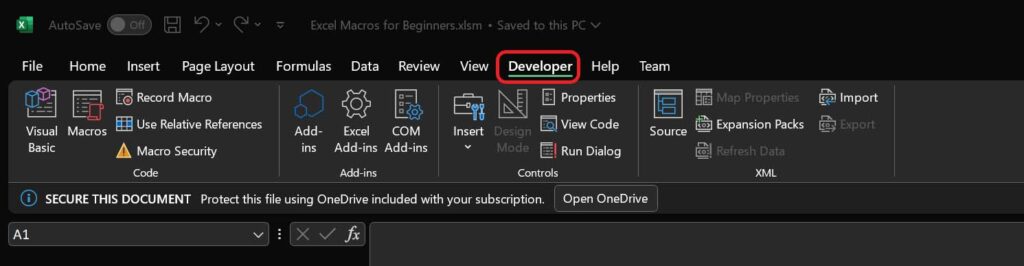
Now, if you go back to your Excel file, you will see the Developer tab on the top.
Recording a Macro
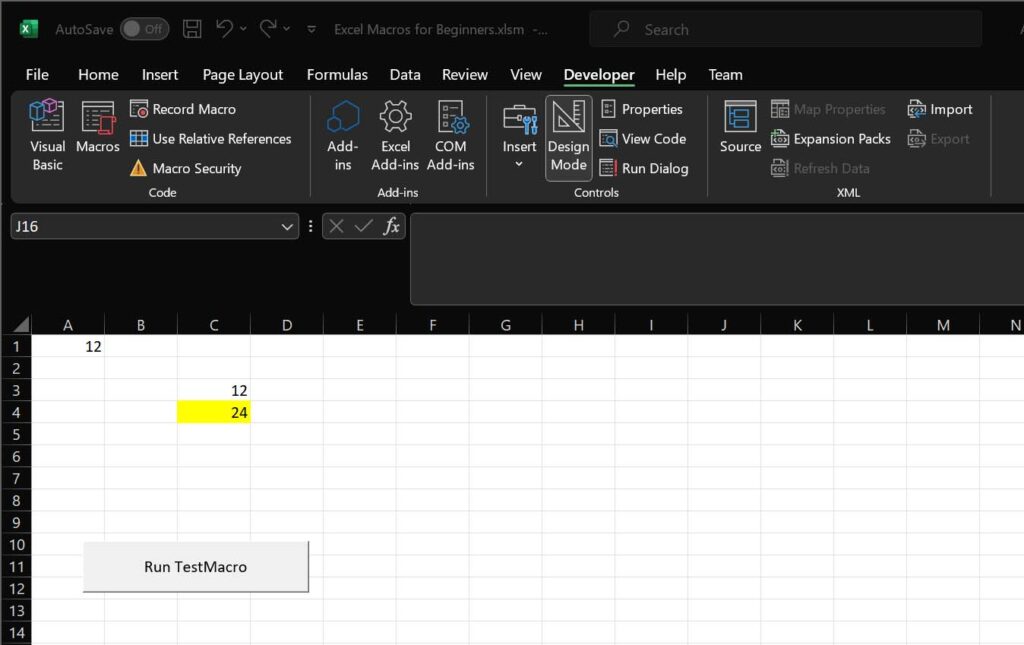
The easiest way to start with Excel macros for beginners is to record a Macro. First, we need to decide what we want Excel to do. For this example, we can do something simple and dummy, such as copying data from a cell to another, writing a formula, and then change the color of a cell.
Before creating the Macro, let’s write any number in cell A1. Then, here are the steps we want to do in our Macro:
- Select cell A1 and copy the content (Ctrl+C)
- Select cell C3 and paste the content copied (Ctrl+V)
- Select cell C4 and write into it the formula
=C3*2 - Color cell C4 in yellow
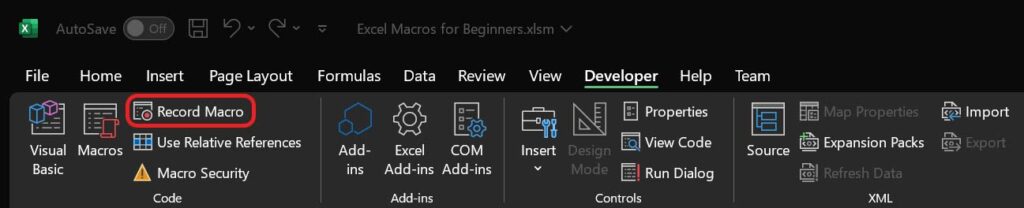
Once you input your initial data in cell A1, go in the Developer tab and hit Record Macro.
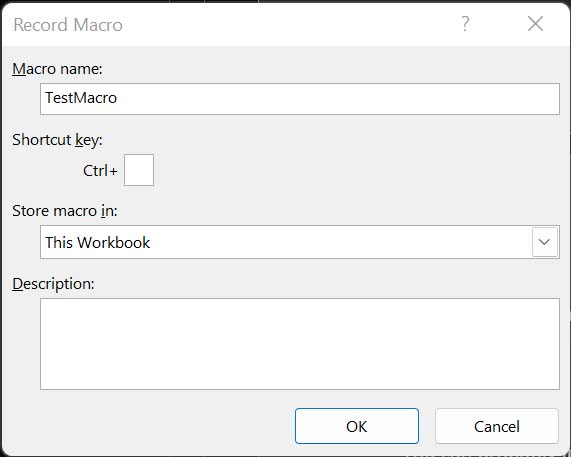
The first thing we are asked is what name we want to give to our Macro. Use a descriptive name that defines the function, what the Macro does. However, since in this case our Macro is doing something with little sense just to show the potential of Macros, we called it TestMacro.
You can optionally specify a shortcut command that (Ctrl + a letter) that will trigger the execution of this Macro, a description, and the scope. The scope defines where this Macro is available. Normally, this should remain to “This Workbook”, so that each file can have its own Macros in it. Finalize these settings and then hit OK.
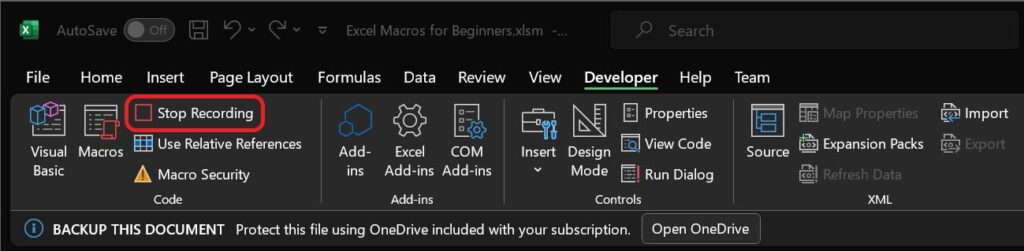
Then, simply do whatever you want your macro to do as if you were doing it yourself. In this case, we will follow the steps described below. Once done, in the Developer tab, click Stop Recording. You are done, your Excel Macro for beginners has been created.
Now, remember you need to do in your Macro everything that you want your macro to do. A common error is about cell selection. If in this example we select cell C1, then we start recording the macro, and then we copy the content, only the copy action will be in the macro. Whenever you execute the macro, it will not go to cell A1 anymore, but it will simply copy the content of whatever cell is already selected.
IMPORTANT NOTE: when you have a Macro in your file, you need to save it as Macro-Enabled Excel file (.xlsm extension, not .xlsx or .xls). Simply select this extension when saving from “Save as type” dropdown.
Running a Macro
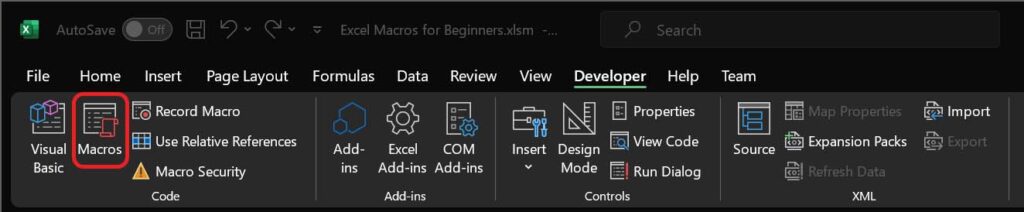
Running a Macro is simple, and it is the next part of our Excel Macros for Beginners tutorial. If you have a Macro that you recorded (or created in any other way), you will see it among the list of macros. Simply go to the Developers tab and select Macros.
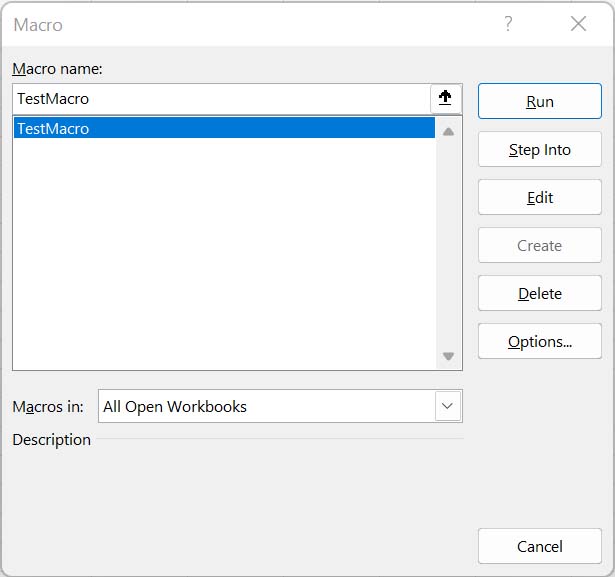
This will open a panel that will show all the Macros available, including the TestMacro we just recorded. To run a Macro, simply select it and hit Run. Now, to see the beauty of the Macro we registered, simply delete everything except cell A1, including the formatting. Run the Macro again and it will re-do the sheet for you.
Run a Macro from a Button
Running a Macro from the developer tab is great, but what if you want your Excel to be used by people who are not well-versed into Macros? After all, to run a Macro you do not necessarily need to understand how to write or create one. With a button, we can create a convenient way for anyone to launch our Macro.
To add a button into an Excel sheet, go in the Developer tab, then Insert > (Button icon).

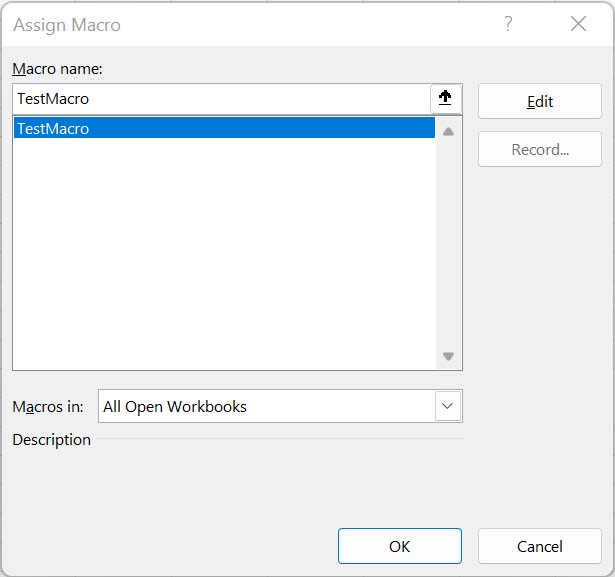
You then need to draw your button by dragging the cursor while holding the left button on the mouse to create a rectangle which will be your button. Once this is done, a window will open to select the Macro to associate to the button. Select our “TestMacro”.
You can optionally rename the button to something you like. To rename the button, it must be selected (with the dragging points around). If you are unable to select it because it triggers the Macro every time you click or right click on it, enter the Design mode from the Developer tab.
Writing a custom Macro
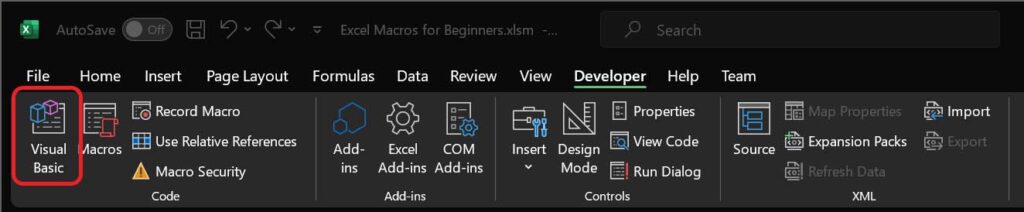
Sometimes, simply recording a Macro is not enough. And, as part of this tutorial on Excel macros for beginners, I wanted to show also the professional way to create macros. In the developer tab, select Visual Basic.
This will open the Microsoft Visual Basic for Application tab. From there, you can look at the Modules tab under the VBAProject and select any module. If you recorded or created a module in the past, you will have at least Module1 there. In fact, in our example below, we have the Macro we just recorded.
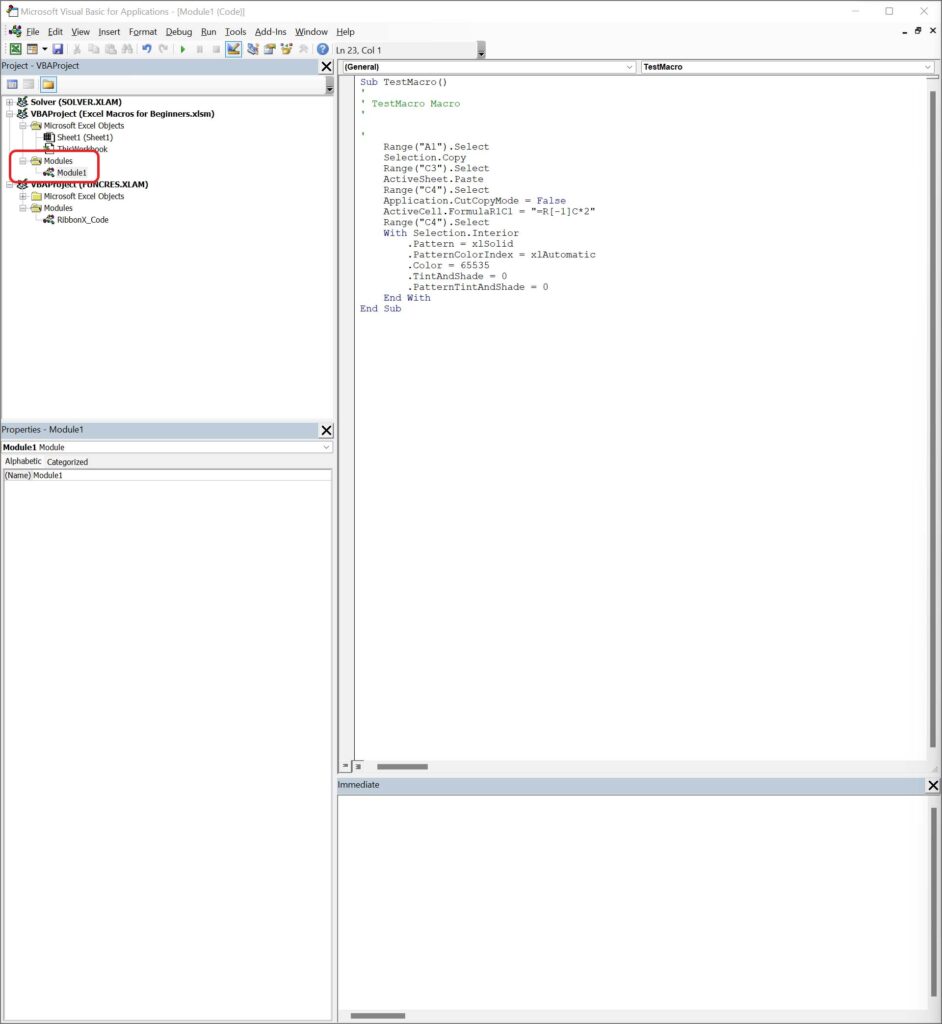
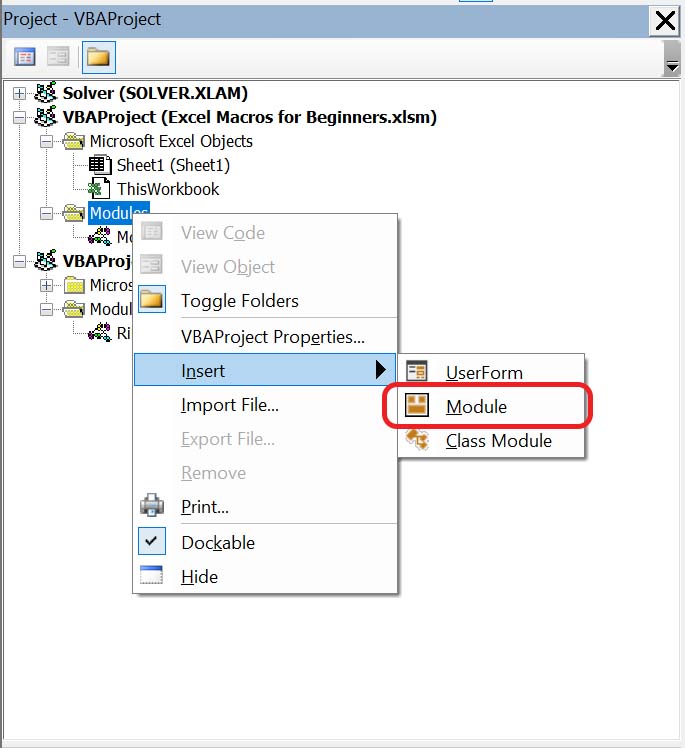
Now, you have two options. You can write additional code in an existing module, or create a new module. A module is just a file that can contain some code: one or more macros or functions. You should use different modules to keep order in your Excel file. If you want to create a new module, right click on Modules tab and add new module.
Regardless of the module you select, you write a Macro with the Sub statement.
Sub MacroName()
    ‘ Your code goes inside here
End Sub
There is no point in teaching you all the code you can write here. After all, this is an Excel macros for beginners tutorial and not an extremely advanced one. To write Macros, you will need to be familiar with programming (to understand algorithms, conditions, loops etc.) and with Excel-specific commands. If you think you have at least a high-level understanding, you can “cheat” a little bit to ask ChatGPT to write Macros for you.
Here is an Example Macro I asked ChatGPT to write with the following prompt.
Write an Excel Macro that takes all the cells in column C of “Analysis” until it finds an empty cell, and transpose them into a new line added to the table “runs” in the sheet” Runs”, also adding a column in the table to show iteration number.
And here is the result.
Sub TransposeCellsToRuns()
    Dim analysisSheet As Worksheet
    Dim runsSheet As Worksheet
    Dim lastRow As Long
    Dim runsLastRow As Long
    Dim i As Long

    ' Set the references to the Analysis and Runs sheets
    Set analysisSheet = ThisWorkbook.Sheets("Analysis")
    Set runsSheet = ThisWorkbook.Sheets("Runs")

    ' Find the last row in column C of the Analysis sheet
    lastRow = analysisSheet.Cells(Rows.Count, 3).End(xlUp).Row

    ' Find the last row in the Runs sheet
    runsLastRow = runsSheet.Cells(Rows.Count, 1).End(xlUp).Row

    ' Determine the next iteration number
    Dim iterationNumber As Long
    iterationNumber = 1
    If runsLastRow > 1 Then
        iterationNumber = runsSheet.Cells(runsLastRow, 1).Value + 1
    End If

    ' Loop through each cell in column C of the Analysis sheet until an empty cell is encountered
    For i = 1 To lastRow
        ' Check if the current cell in column C is empty
        If analysisSheet.Cells(i, 3).Value = "" Then
            Exit For
        End If

        ' Transpose the value to the Runs sheet
        runsSheet.Cells(runsLastRow + 1, 1).Value = iterationNumber
        runsSheet.Cells(runsLastRow + 1, 2).Value = analysisSheet.Cells(i, 3).Value

        ' Increment the row index in the Runs sheet
        runsLastRow = runsLastRow + 1
    Next i
End Sub
Excel Macros for Beginners Wrap Up
In this brief tutorial, we saw how to write Excel macros for beginners. In short, start by recording it with the developers tools, and as you gain confidence upgrade your experience by writing them yourself (maybe with a little help from ChatGPT).
You can download our example sheet from here.
To boost your skills, and learn how to write better Macros even, I suggest you start learning programming with this incredibly good Python course.
