Tables are a neat way to represent data because they help you visualize things. They are much quicker than a long and boring description. It is no surprise that we can create HTML Tables using HTML code. That’s exactly what we are going to do in this HTML tutorial: create some HTML tables.
If you want to create some HTML tables, you should grasp the basics of HTML already. If you don’t, you can learn them quickly by checking this guide to HTML basics. Otherwise, just keep reading.
How to Create HTML Tables
The Concept
Just like any other HTML code, creating tables is fairly simple. Yet, we should first understand the logic behind it.
The first thing you want to know is that tables are two-dimensional, they represent data in rows and columns. However, our HTML file is mono-dimensional, just like any text. You just write a sequence of words (or tags) one after the other, with no concept of dimensions.
This means we cannot create tables visually inside HTML, but we should create them logically. And indeed we can. Think about it in this way:
A table is a sequence of rows.
Then, we should define what is a row. If you are getting the point, you’ll have figured it out already:
A row is a sequence of cells.
And, with this in mind, we can start creating our amazing tables.
The Tags
To create HTML tables, we need to use at least three different tags. We need to use a tag to define the table, one to define the rows, and one to define the cells in each row.
To define your table, you want to use the <table>...</table> tag. This just tells its content is a table: a sequence of rows.
Then, inside your table, you need to define one or more rows. Each should be defined with <tr>...</tr>, which stands for table row. Of course, to define more than one you just repeat this tag over and over.
Finally, inside each of your row, you will have to define your cell. For that, we have the <td>...</td> tag, and inside it, we can put directly our content. Such content may be a paragraph, a picture, or even directly text (with no other tags). If you are curious, TD stands for table data.
Obviously, each row must contain the same number of cells like all the others. Otherwise, the HTML will not render correctly and it will look very messy. There’s a way to “merge” two or more cells, and we will see that in a bit.
Putting it all together
The goal of this HTML Tutorial is to create HTML tables, and so here’s a quick example you can use.
<table>
  <tr>
    <td>Item</td>
    <td>Price</td>
  </tr>
  <tr>
    <td>Baguette</td>
    <td>$3.00</td>
  </tr>
  <tr>
    <td>Croissant</td>
    <td>$2.00</td>
  </tr>
  <tr>
    <td>Italian Focaccia</td>
    <td>$4.50</td>
  </tr>
</table>
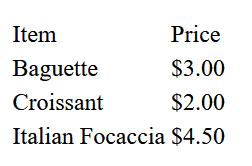
This will create a pretty ugly table like the one below.

Of course, we could apply styles to it with CSS, but that’s not the point for now.
Header, Body, and Footer
Just like our page, our table can also have a header, a body, and a footer. Maybe footers are not so common, but headers and bodies are pretty popular. After all, you often want to have the title of each column in the very first row, and that’s a header.
We have three tags coming to our help, and we use all three to enclose rows. In other words, we put them between the <table> and the <tr> tags.
<thead>...</thead>Should include one or more lines that act as the header of the table.<tbody>...</tbody>Should include all the lines that are part of the table content.<tfoot>...</tfoot>is the tag to use if you have any trailing lines that are not part of the content. For example, you could repeat the header at the end for easier browsing of the table. Anyway, I wouldn’t recommend it.
Now, either you use them or don’t. If you put a header, then other <tr> tags cannot be direct children of <table>, they must go in a header, a body, or a footer.
One more thing: the cells that are part of the header are not data of the table. They are header, and indeed it would be more appropriate to use the tag dedicated to that: <th>...</th>. The same does not apply to the footer.
Our previous table can receive a quick upgrade with these concepts.
<table>
  <thead>
    <tr>
      <th>Item</th>
      <th>Price</th>
    </tr>
  </thead>
  <tbody>
    <tr>
      <td>Baguette</td>
      <td>$3.00</td>
    </tr>
    <tr>
      <td>Croissant</td>
      <td>$2.00</td>
    </tr>
    <tr>
      <td>Italian Focaccia</td>
      <td>$4.50</td>
    </tr>
  </tbody>
</table>
We have omitted the footer, but you could add one if you want.
Merging Cells
Sometimes, you want to merge cells together. Maybe this is not something you want to do for a simple menu, but it’s something a financial analyst would probably like.
In HTML, we have two ways of merging cells: rowspan and colspan. That’s because merging horizontally and vertically are two different things, and we may apply a combination of both.
- With rowspan, you span a cell across rows, taking the space of the cell (or cells) below it.
- Instead, with colspan, you span a cell across columns. This means it will take the space of the cell (or cells) on its right.
How many cells are we merging together? You decide it by providing a number to either attribute. The attribute should indicate the total number of cells you are spanning on. For example, if you want to merge two cells, you will specify 2. This will translate in your cell occupying its own space plus the one of one other cell.
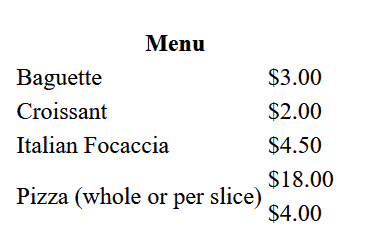
Seeing it in action works better than any kind of explanation. Remember, both colspan and rowspan are attributes of the <td> tag. In this example, we make our header span across two cells horizontally, and we create one last item spanning two cells vertically.
<table>
  <thead>
    <tr>
      <th colspan="2">Menu</th>
    </tr>
  </thead>
  <tbody>
    <tr>
      <td>Baguette</td>
      <td>$3.00</td>
    </tr>
    <tr>
      <td>Croissant</td>
      <td>$2.00</td>
    </tr>
    <tr>
      <td>Italian Focaccia</td>
      <td>$4.50</td>
    </tr>
    <tr>
      <td rowspan="2">Pizza (whole or per slice)</td>
      <td>$18.00</td>
    </tr>
    <tr>
      <td>$4.00</td>
    </tr>
  </tbody>
</table>
This will result in the following HTML table. Look at the tile, which spans both columns, and the Pizza item, which has two prices.
Also, looking at the code, that the last line has just one cell. That’s because the other one is coming from the merge of the cell above.

The Golden Age of HTML Tables is Over
Any developer working with HTML should know HTML tables. That’s a fact. However, it’s important to understand that they don’t play the crucial role they played in the past. Even more, modern design patterns despise and try to avoid tables as much as possible. Are HTML tables really so bad? Why?
Super-short history of tables
First, we need to understand how tables became popular in the first place. In the early days of web development, styling your pages was quite a pain. Tables provided a quick way to arrange the content of your page with an order. So, it was common to see a table containing more tables, containing other tables. For example, your entire page may be a table where the first row was the page header, and all subsequent rows were paragraphs.
Then CSS came, and we realized that maybe we could use CSS to style our pages and make them readable. However, tables became quite popular to represent data that, guess what, is meant to be in a table. Imagine you want to represent a list of users, each with name, email, last login and description. It looks like something that is meant to be a table, right? Wrong!
The problem with HTML Tables
Tables are nasty because they define how the content should be styled.
Think about it. You just want to represent a list of users, there is no intrinsic reason for that to be a table. Yes, a table is an easy way to represent it, but it’s just like that. It’s a style you apply to your data, and HTML tables would block you to that style.
This problem is evident with mobile devices because tables don’t fit well on small screens.
So, what is the modern way to do it? We create a custom layout (using <div> mainly). Then, we use CSS to make this layout look like a table if the screen is large enough. Otherwise, we represent it in a different way or drop columns we don’t need. However, that’s for advanced users, we won’t go into that for now. Still, if you want to learn more about HTML Layouts, check out this tutorial.
Be a Full Stack Developer!
Just knowing some HTML is not enough if you want to create an awesome application. Especially if all the HTML you know is about HTML tables. But you need to start somewhere, that’s why we have a Full Stack Developer Guide, and this HTML tutorial you are reading is part of it.
So, if you are following this guide, you are building a Bakery Store website. Create a new page, name it menu.html and in it add your menu, using a table with some tricks like spanning among rows and columns. Don’t forget to add the page in the links we already have in the header.
If you are not following this guide but you want to start, start here.
Once you are all set, you can verify your work against the GitHub repository of the guide at alessandromaggio/full-stack-course. Even better, check out the code I created specifically for this HTML Tables tutorial by looking at this commit.
Conclusion on HTML Tables
In conclusion, HTML tables are probably nasty but you need to know them. And they are not so challenging after all, so here’s a quick TL;DR.
- Create your table with the
<table>...</table>tag, and… - …inside it create as many rows as you want, each defined with
<tr>...</tr>. - Inside each row, create as many cells as you want with
<td>...</td>. However, all the rows should have the same amount of cells.
Hopefully this will get you started with HTML Tables!